Monday, January 14, 2013

Is a fixer right for you?

The Spokane market is full of houses that need a little TLC. Whether it's updating a 1980's bathroom, ripping out carpet and adding hardwoods, or installing vinyl windows, these diamonds in the rough just need your personal touch to make them shine. Now it does take some imagination and you have to look past the apparent defects, but if you can do this, you can make the house exactly what you want. Example below...


But how do you come up with the money to make these fixes after you purchase the house? (Because I know I couldn't cook in the first kitchen.) Glad you asked. The government has started a program called an FHA 203k loan that can allow you to wrap the purchase of the home and the renovations into one mortgage. It takes some extra effort on your part to find contractors for the work but I could help you get the bids and find the right contractor for you. This still allows you to take advantage of low interest rates and still get the house you want for a great deal.

This article explains more of the qualifications needed:
http://www.forbes.com/2010/06/18/fha-home-repair-loan-personal-finance-203k.html

This program is not for everyone but allows you to look at a broader range of houses and find a great deal in the area that you want. If you have any questions or want me to start looking for your diamond in the rough, give me a call or shoot me an email.

Tuesday, October 9, 2012

End of Summer...New Yard!

This summer has flown by. Between work, photo booth, and showing houses I have not had much time for the house renovations. We hit the final straw when the following conversations occurred:

Neighborhood Kid: "Can I hide behind you car for a second? I'm hiding from my friends."
Jordan: "Sure."
Neighborhood Kid: "Can I walk on your grass to get away?" (with a concered look on his face)
Jordan: "Of Course."
Neighborhood Kid: "What happened to it? Is it poisoned?"

I assured him that he was safe and retreated to the house. Needless to say, our house was still the eye sore in the neighborhood as all the work we completed was inside. The yard resembled a weed field with 15 different types of weeds. So, let the project begin! We decided to rototil up the front and back yard, install a sprinkler system, lay sod, and build a gravel parking area for the truck. This was a huge undertaking, and luckily Josiah stuck around to help. The picture below is the old yard and beautiful yellow house before the paint and the new yard. At least at this point the weeds were green. (As the summer went on, at one point I actually commented to Whit, "I wonder if we could harvest the wheat in our yard.")


The rototilling took longer than expected but we had the sprinklers operational in two days and ready to lay the sod.

 
For the sod, we used Ray's Turf Farm and my brother Jon came to the rescue to help lay all of it. The brothers installed the entire yard (5000 square feet) in less than 6 hours. It was an amazing process to see and they made it look easy. We put fertilizer down first and then watered the yard for 3 days prior to laying the sod. This allowed the ground to settle and made it easy to lay the sod when needed. Then we let the sprinklers do their thing and the yard hasn't died yet...still crossing our fingers.


And here's the finished product! Our beautiful GREEN yard!


The yard turned out better than I could have imagined. We were able to enjoy some BBQs out there and I even laid in the grass at one point. If you have any questions or need pointers for changing your own curb appeal, let me know.

Lastly, we had a large space near the garage and didn't want to put more grass in so we created a RV/truck parking area with compacted gravel. The garage doors are ordered and we should be parking in the garage before winter. This space has been perfect and a good addition, especially since there is plenty of yard space.


As always, if you are interested in looking at a house let me know as the prices seem to fall as the winter approaches.


Sunday, May 20, 2012

New mud room!

I thought things would slow down when the good weather finally arrived, but that has not been the case. More clients are looking for houses, the photo booth season has started, and work at SNAP is steady. We are finally finishing up projects on the house and we were able to get more creative with the mud room. So this has moved onto my list of must haves in a house. We have a utility sink, stackable washer and dryer, and cabinets for storing linens, tools, and food. With all of the projects going on, it is a great landing spot when coming inside with dirty clothes or paint. Just saying, consider having one in your house.

I know I promised to post exterior photos in my last post but I had to give you something to wait for...kinda like your favorite tv show. So the mud room will have to suffice for now.

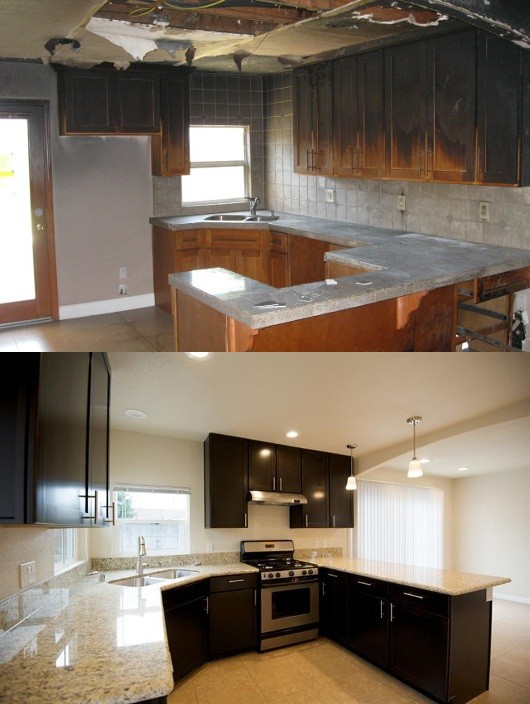
So I don't know if you remember from the first post, but one reason the house came back on the market for us to purchase was mold. Most of the mold was in the laundry room so we knew repairs were needed. So here are the before pics...


As you can see, there is excessive mold. Always be careful when you see mold, it usually means there is moisture in the room and Home Depot sells a mold/bacteria cleaner that you can use to get rid of the mold. As HGTV says, wear a mask when disposing of the moldy parts.

We wanted this room to be more functional and have storage with a utility sink for washing the dog and cleaning things we didn't want to clean in the kitchen sink (paint, dirt, etc.). So we gutted the room and found there was no insulation. So we added a new window and door, installed insulation, cabinets, utility sink and custom backsplash, and a new stackable washer/dryer. Then we installed a tile floor and finished it off with trim, new paint, a new light fixture, and a dog door for Maggie. This room stands between the kitchen and the deck outside. We use this room all the time.

Here are the after pics and let me know what you think...


The backsplash took use a little longer to plan but we found these glass mosaic tiles at Home Depot. We use the adhesive backing instead of mud as it is cleaner and you can grout immediately after. I highly recommend using this product...very user-friendly.

The washer and dryer we found at Fred's Appliance. We had an apartment unit (that we are now selling for $300 if anyone needs a washer/dryer unit.) They free up space in the mud room and are more energy efficient.

Let me know what you think! Now you have to find a place with a mudroom or I guess you could just repurpose a room in your existing house. I will keep posting a few more projects and be a little more timely. These are definitely do it yourself projects and I can let you know where we got each of these  products. Just let me know.

Saturday, April 7, 2012

The Big Reveal!

The saying "easier said than done" describes the renovation of the living and dining room. So this process has taken a little longer than anticipated, but we have completed the renovation of the main floor. The hardest and most painstaking part had to be the living and dining room. The long and short of it...the texture on the walls was probably two inches thick, we opened the walls to find no insulation and knob and tube wiring throughout. The upstairs was supported by 2x4s so needless to say, we used the upstairs as a trampoline before the renovation. The space was cramped with a "character" adding arch and a large closet space. So we decided to open up the entire space. We knew this was going to be the biggest project when we moved in, but nothing can prepare you for the demolition (2 trailers full, 5 truck loads, and 5 garbage cans full of debris). I am just thankful that our friends and family were able to come help and make this process go much more smoothly!

Below are the "before" pictures of the two spaces (the dining room and the living room):


The process started by tearing down the lathe and plaster. (Warning: do not attempt on your own, it will leave dust and debris EVERYWHERE!) We then realized that we needed to stregthen the upstairs floors and dropped the ceilings about 8 inches. Then Cam and my dad updated the electrical and installed the can lights and chandelier. I then bravely attempted to install all outlets and when power was turned back on 95% of them were working. I consider that a success. Next we put in the insulation and installed the new windows. Then came the sheet rock, mud and tape, and paint to seal the deal. Since we took the arches and closet out, we decided that we should add some architectural detail, so we created box beams from hemlock to help separate the spaces. My dad also built a small coat closet just off the entryway. Lastly, Pat framed out the windows to give them the finished look, while Cam watched me install the floor trim. Oh, and I can't forget, our moms stained our hardwood floors on their hands and knees! It was amazing how the rough-in work went so quickly and the finish work took so long.

Now the space is done and we can finally enjoy it. Whit finished off the decorating with some art, and my addition of a new, bigger TV. (Guys, just explain that the wall is too large for a small TV). Below are pictures of the finished product:


Sorry, for some reason these two pictures wouldn't format correctly...


We are excited to be done with the main floor, and with the weather getting better, we want to have everyone over soon. It has been an incredible process. If you are interested in your own project or just want an investment or new place to live, just let me know and we can find you a deal. Let me know what you thought of the renovation as any suggestions will be used for the next project.

Now for the outside of the house...!

Monday, February 20, 2012

Kitchen Makeover!

"Kitchens sell homes!" That's the motto anyways. But I think more than that, a kitchen is where we live, it's were come together at the end of a long day of work with a glass of wine or beer. Whit and I don't cook very often, yet we still find ourselves lounging and snacking in the kitchen (at least until the ice cream runs out). So we thought we would liven up the decor of the plain kitchen with glass tile back splash and some stainless steel appliances to make it more of an inviting space. Also, Pat contributed the wow factor for the kitchen with a custom bar, located perfectly for watching Whit cook ;)

The best story is when we thought we would go without a dishwasher. This lasted two days and one load of dishes before Whit set the cup down and we loaded into car bound for Fred's Appliances. It didn't takes us long to find one and we had it plumbed and installed the next day. You don't realize how much you miss something until it is gone.

As you will notice, the theme of the old kitchen is YELLOW! I think they had some left over from the exterior paint and decided "why not?" and then covered everything with it. The cabinets, floors, under cabinet lights and sink were included with the sale of the home...very excited about that.


So now that you saw the "before", here is the "after". We started by opening up the entrance to the kitchen to connect it to the other rooms and extend the open floorplan with hemlock trim around the opening. Then we continued by adding a glass tile/travertine back splash. Next we installed a dishwasher and added new appliances. Then we put in the two tiered bars with stools. Then we painted the yellow out of the kitchen with a smooth tan color. Lastly, we installed vinyl windows to finish off the space.


We weren't sure if it would be too much wood in the kitchen with the cabinets and the trim and the bar, but it works very well and it's functional. Luckily, we didn't have to gut the entire kitchen and start from the studs. So a few upgrades went a long ways.

If you are interested in the back splash, we were able to find it on sale at Home Depot and install it in less than a day with the "mud less" adhesive. It sticks to the walls and the tiles adhere to it. After it is applied, it is ready to grout. Another valuable lesson is to buy the grout sealant that evaporates from the tile so that you do not have to worry about it glazing the tile. (This tip can save you hours of work scrubbing tiles). The bar is made out of a glu-lam beam and for more details I will have to ask Pat. He is so talented. If you have any questions let me know. Hopefully I can give you some ideas and ultimately save you some time and money.

If you are interested in looking for a house this spring, let me know and I will start keeping an eye out for you.